
 |

|
Lighting |
Tutorials > OpenGL ES > Lighting
| View Full Source |
Introduction
 In the previous tutorials, many of the scenes have appeared a bit bland. This tutorial
will explain how lighting can be added to your scenes. This increases the overall
realism and look of your programs.
In the previous tutorials, many of the scenes have appeared a bit bland. This tutorial
will explain how lighting can be added to your scenes. This increases the overall
realism and look of your programs.
Lights
There are a number of different types of lighting that can be added to your OpenGL scenes :
Ambient Light
Ambient light does not come from any particular direction. When ambient light hits a surface, the light is reflected in all directions.
Diffuse Light
Diffuse light is different from ambient light in that it comes from a particular direction. Diffuse light is similar to ambient light in that it is reflected in all directions.
Specular Light
Like diffuse light, specular light is directional but it is reflected sharply back in a particular direction. You may have seen a bright highlight on a surface before. This is known as a specular highlight.
Emissive Light
Emissive light is light that comes from a specific object. The object gives off an amount of light, but it does not reflect off any surfaces.
Materials
Not only can you specify lighting properties, but you can specify how various surfaces must react to light. This is known as specifying material properties.
This specifies how much of a particular light source must reflect off of a surface.
Normals
Normals are vectors perpendicular(at 90 degrees) to a particular surface. These are used in lighting calculations. You need to specify a normal for every polygon that is drawn if you wish for it to be affected by lighting. This will be shown further below.
Another important note is that normals should be normalized. We will not go into the maths of this as it is not needed for this tutorial. It may be explained in a future tutorial if need be. In short, the length of a vector is calculated by taking the square root of the sum of the squares of each value in the vector. Each value in the vector must then be divided by the vector length. Do not worry too much about this for now.
Contents of main.cpp :
Below, we create 2 color arrays, one for ambient and for diffuse light. This will be the color of the light source.
float lightAmbient[] = { 0.2f, 0.3f, 0.6f, 1.0f };
float lightDiffuse[] = { 0.2f, 0.3f, 0.6f, 1.0f };
Next, we create an array for the material properties. One for the ambient and one for the diffuse light source.
What this essentially does is multiply the light values by the material values to get the resultant color reflecting off of the surface. The arrays below therefore cause the surface to lose 40% of the light. Each value represents the amount that a particular color is reflected.
float matAmbient[] = { 0.6f, 0.6f, 0.6f, 1.0f };
float matDiffuse[] = { 0.6f, 0.6f, 0.6f, 1.0f };

void init()
{
Our first step in creating lighting effects is to pass the GL_LIGHTING flag onto the glEnable function. This enables lighting for your OpenGL scene.
glEnable(GL_LIGHTING);
OpenGL allows you to have a maximum of 8 lights at any particular point in time. To enable one of these lights, you need to pass GL_LIGHTX onto the glEnable function where X is a value from 0 to 7.
glEnable(GL_LIGHT0);
To specify material properties, the glMaterialfv and glMaterialf functions can be used. The glMaterialfv function is used to for parameters with multiple values and the glMaterialf function is used when one value is needed. This will become more evident later. The first parameter specifies what faces are being updated. In OpenGL ES, the GL_FRONT_AND_BACK flag is the only flag that can be passed. Any other flag will not have any effect. The only reason the parameter is here is because standard OpenGL allows other values.
The second parameter is used to specify what type of light you are setting properties for eg. GL_AMBIENT, GL_DIFFUSE, GL_SPECULAR, GL_EMISSION and GL_AMBIENT_AND_DIFFUSE.
The last parameter accepts an array or a single value depending on if you are using the glMaterialfv or glMaterialf function respectively.
The next two lines set the material properties for our surface.
	glMaterialfv(GL_FRONT_AND_BACK, GL_AMBIENT, matAmbient);
	glMaterialfv(GL_FRONT_AND_BACK, GL_DIFFUSE, matDiffuse);
Like setting material properties, light properties can be set in the same way. This can be done using the glLightfv and glLightf functions. They work in the same way as the functions above.
The code below sets the properties for the light.
	glLightfv(GL_LIGHT0, GL_AMBIENT, lightAmbient);
	glLightfv(GL_LIGHT0, GL_DIFFUSE, lightDiffuse);
The rest of the init method remains the same.
	glEnable(GL_DEPTH_TEST);
	glDepthFunc(GL_LEQUAL);

	glClearColor(0.0f, 0.0f, 0.0f, 0.0f);
	glClearDepthf(1.0f);

	glVertexPointer(3, GL_FLOAT, 0, box);
	glEnableClientState(GL_VERTEX_ARRAY);

	glEnable(GL_CULL_FACE);
	glShadeModel(GL_SMOOTH);
}
The beginning of our display function remains the same.
void display()
{
   glClear(GL_COLOR_BUFFER_BIT | GL_DEPTH_BUFFER_BIT);
   glLoadIdentity();

   gluLookAtf(
		0.0f, 0.0f, 3.0f,
		0.0f, 0.0f, 0.0f,
		0.0f, 1.0f, 0.0f);

   glRotatef(xrot, 1.0f, 0.0f, 0.0f);
   glRotatef(yrot, 0.0f, 1.0f, 0.0f);
Above, we spoke about normals. These normals need to be perpendicular to the surface. The front surface therefore has a normal vector of (0,0,1) and the back surface has a normal of (0,0,-1). The length of both vectors is 1 and therefore both are already normalized.
Normals are specified by placing a glNormal3f function call before rendering the primitives. This function takes 3 floats making up the normalized vector.
   // FRONT AND BACK
   glColor4f(1.0f, 0.0f, 0.0f, 1.0f);
   glNormal3f(0.0f, 0.0f, 1.0f);
   glDrawArrays(GL_TRIANGLE_STRIP, 0, 4);
   glNormal3f(0.0f, 0.0f, -1.0f);
   glDrawArrays(GL_TRIANGLE_STRIP, 4, 4);
The same is done for the top, bottom and sides. Like the color and vertex arrays, there is also a normal array. You can set the normal array by making a call to the glNormalPointer function. This works in the same way as the glVertexPointer function. To enable the array, the GL_NORMAL_ARRAY flag needs to be passed onto the glEnableClientState function.
   // LEFT AND RIGHT
   glColor4f(0.0f, 1.0f, 0.0f, 1.0f);
   glNormal3f(-1.0f, 0.0f, 0.0f);
   glDrawArrays(GL_TRIANGLE_STRIP, 8, 4);
   glNormal3f(1.0f, 0.0f, 0.0f);
   glDrawArrays(GL_TRIANGLE_STRIP, 12, 4);

   // TOP AND BOTTOM
   glColor4f(0.0f, 0.0f, 1.0f, 1.0f);
   glNormal3f(0.0f, 1.0f, 0.0f);
   glDrawArrays(GL_TRIANGLE_STRIP, 16, 4);
   glNormal3f(0.0f, -1.0f, 0.0f);
   glDrawArrays(GL_TRIANGLE_STRIP, 20, 4);

   glFlush();
   glutSwapBuffers();
}
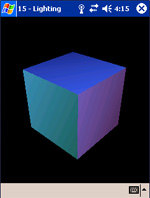
Our menu has been modified to include a Color Material menu option. This enables and disables what is called color tracking and is specified with the GL_COLOR_MATERIAL flag.
What color tracking does is that it automatically sets material properties according to your calls made to glColor4f. Enabling this will cause the different sides to reflect their respective color.
	case 2 :
		if (glIsEnabled(GL_COLOR_MATERIAL))
			glDisable(GL_COLOR_MATERIAL);
		else
			glEnable(GL_COLOR_MATERIAL);
		break;
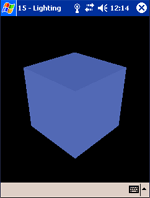
The two images below show the difference between the standard lighting we specified above and the same scenario with color tracking enabled.
| Normal Lighting | Color Tracking |
|
 |
You should now be able to add lighting to your scenes. This provides great flexibility and allows your scenes to appear more lifelike.
Please let me know of any comments you may have : Contact Me
| GLUT|ES Source Files : |  |
|
| UG Source Files : | |
Last Updated : 20 November 2005
| < Tutorial 14 - Backface Culling | Tutorial 16 - Directional Lighting > |
All Rights Reserved, © Zeus Communication, Multimedia & Development 2004-2005
Read the Disclaimer
 |
|
|
|
What tutorial would you like to see next? |
|
Useful Books : 
|
Link to ZeusCMD

|