
 |

|
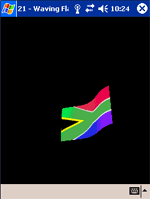
Waving Flag |
Tutorials > OpenGL ES > Waving Flag
| View Full Source |
Introduction
 This tutorial is going to be slightly different to the previous tutorials. Instead of
showing you something new, we are going to be seeing how you can use your
knowledge gained in the previous tutorials to create an interesting effect.
This tutorial is going to be slightly different to the previous tutorials. Instead of
showing you something new, we are going to be seeing how you can use your
knowledge gained in the previous tutorials to create an interesting effect.
We will be discussing how a waving flag can be created.
You may want to take a glance at the texture mapping (tutorial 17) tutorial as this knowledge is required for this tutorial.
We will be using a small amount of mathematics in this tutorial. You should also be comfortable with the sin and cos graphs as well as converting between degrees and radians.
Contents of main.cpp :
The first step is to create a PIOVER180 constant. PI is equal to 180 degrees so PIOVER180 is equal to 1 degree.
#define PIOVER180 0.01745329252
We make space for our flag texture. We also create two arrays to hold our flag object. The one array is the vertex array and the other is the color array.
To create the flag effect, we need to divide the flag into a number of cells. This allows different parts of the flag to lie at different parts of the z axis. Obviously, the greater the number of cells, the smoother the flag will appear. The arrays below will create a flag consisting of 10 rows and 18 columns. The column value needs to be doubled to allow for duplicate vertices. You will see this in the initFlag function further down in the tutorial.
GLuint texture[1];
float flagPoints[10][36][3];
float flagCoords[10][36][2];
An extra value is created for wrapping the flag coordinates. You will see how this is used below.
float wrapValue;
Below is an initFlag function. This function sets up our flag model.
void initFlag()
{
We create 3 variables that will help us when looping through the flag cells.
You may be slightly confused about what we are trying to create here. The flag is made up
of a number of triangles as shown below.
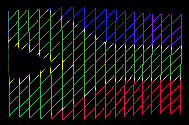
This flag mesh allows deformation of the flag.
	int x;
	int y;
	int apos;
The code below uses a double for loop to create the mesh. To be able to create the flag using anti-clockwise triangles, we create the flag one horizontal strip as a time. There are 10 of these horizontal strips.
	for (y = 0; y < 10; y++)
	{
We now loop through each cell in the horizontal strip. We use the apos variable to keep track of the current x position. The x variable keeps track of the current cell index.
For every iteration, we create 2 triangles.
	  for (x = 0, apos = 0; x < 18; x++, apos += 2)
	  {
To create the horizontal strip, we create vertices in pairs of two. These represent the top and bottom vertices of the cell.
Our first vertex is created at position x and 1 above position y.
The z value is slightly more complex. We use the sin function to create a wave pattern. We multiply the x value by 20 as one wave is created every 180 units. We convert these degrees to radians and then multiply the result by 1.5. This specifies the amplitude of the wave. The larger the value, the greater the size of the wave.
	    flagPoints[y][apos][0] = float(x);
	    flagPoints[y][apos][1] = float(y + 1);
	    flagPoints[y][apos][2] = float(sin(x * 20.0f * PIOVER180)) * 1.5f;
Now that we have specified the coordinates for the first vertex, we need to specify the texture coordinate for it. As there are 18 columns, we need to increase the x texture coordinate by 1.0 / 18.0 for each column. This is the same for the y coordinate except that there are only 10 rows.
	    flagCoords[y][apos][0] = x * 1.0f / 18.0f;
	    flagCoords[y][apos][1] = (y + 1) * 1.0f / 10.0f;
Our second vertex is created in the same way. The only difference is the y value.
	    flagPoints[y][apos + 1][0] = float(x);
	    flagPoints[y][apos + 1][1] = float(y);
	    flagPoints[y][apos + 1][2] = float(sin(x * 20.0f * PIOVER180)) * 1.5f;

	    flagCoords[y][apos + 1][0] = x * 1.0f / 18.0f;
	    flagCoords[y][apos + 1][1] = y * 1.0f / 10.0f;
	  }
	}
}
Now that we have initialized the flag mesh, we need to specify how the flag animates every frame. This is done in the idle function.
void idle()
{
As per normal, we increase the rotation values.
	xrot += 2.0f;
	yrot += 3.0f;
You will now be able to see how the wrapValue variable is used. We assign wrapValue with the z value of the last column. This is because we are going to take this value and place it at the beginning of the flag. We take the z value from the first row but this could be taken from any row as the entire column has the same z value.
wrapValue = flagPoints[0][35][2];
We now loop through all cells and assign their z values to that of the cell to the left. We do this for all cells except for the first column.
	for (int y = 0; y < 10; y++)
	{
		for (int x = 35; x > 0; x -= 2)
		{
			flagPoints[y][x][2] = flagPoints[y][x-2][2];
			flagPoints[y][x-1][2] = flagPoints[y][x-3][2];
		}
The first column's z value is assigned the value stored in wrapValue. As the name suggests, this causes the sin wave to wrap around when reaching the end of the flag.
		flagPoints[y][0][2] = wrapValue;
		flagPoints[y][1][2] = wrapValue;
	}
As usual, the frame needs to be redisplayed to show the changes.
	glutPostRedisplay();
}
When displaying the flag, there are 2 important differences to take note of.
The first is that we translate the modelview matrix to allow the flag to appear in the viewport. We move it down and to the left as we start drawing the flag from the origin towards the top-right.
glTranslatef(-3.0f,-3.0f,-60.0f);
The other difference in our display function is how we render the flag.
We have to loop through each horizontal loop and then display the strip by passing i * 36 to the glDrawArrays function. This is because a new strip is defined every 36 elements. We also keep track of a wireframe variable. This determines if the flag should be rendered as triangles or lines (shown above).
	for (int i = 0; i < 10; i++)
		glDrawArrays(wireFrame ?
			GL_LINE_STRIP : GL_TRIANGLE_STRIP, i * 36, 36);
Congratulations. You have now learnt how to create a waving flag using the techniques you have learnt previously. When running the program, you can switch between wireframe and solid mode by selecting the Toggle Wireframe option. If you wish to see more tutorials of this nature, please let me know.
Please let me know of any comments you may have : Contact Me
| GLUT|ES Source Files : |  |
|
| UG Source Files : | |
Last Updated : 20 November 2005
| < Tutorial 20 - Transparency | Tutorial 22 - Fog > |
All Rights Reserved, © Zeus Communication, Multimedia & Development 2004-2005
Read the Disclaimer
 |
|
|
|
What tutorial would you like to see next? |
|
Useful Books : 
|
Link to ZeusCMD

|