 |

|
Depth |
| View Full Source |
Introduction
 Up until now, any primitives that you displayed would appear on top of each other depending
on the order that they were displayed in. This would occur, even if the primitives had
different z values.
This tutorial will discuss how the depth buffer can be used to correctly identify which objects should be displayed in front and which objects should be hidden or occluded. This allows the z coordinate to work correctly.
The depth buffer contains a value for every pixel on the screen. This value is in the range [0,1] and represents the distance between the object and the viewer. Every coordinate has an associated depth value. When two depth values are compared, a depth function is used to determine which of the two values will appear on the screen. A coordinate that is in front of another will have a lower depth value. You will see how this works further down in the tutorial.
Contents of main.cpp :
This tutorial will show how the depth buffer works by rendering a few triangles to the screen. To simplify this, a drawTriangle function has been created.
void drawTriangle()
{
	glBegin(GL_TRIANGLES);
		glColor3f(1.0f, 0.0f, 0.0f);
		glVertex2f( 0.5f, -0.5f);
		glColor3f(0.0f, 1.0f, 0.0f);
		glVertex2f( 0.0f,  0.5f);
		glColor3f(0.0f, 0.0f, 1.0f);
		glVertex2f(-0.5f, -0.5f);
	glEnd();
}
To enable the depth buffer, we modify the init function.
bool init()
{
	glClearColor(0.93f, 0.93f, 0.93f, 0.0f);
The first step that must be taken is to enable the depth buffer. This is done by passing the GL_DEPTH_TEST flag to the glEnable function.
For the depth buffer to be updated for writing, GL_TRUE needs to be passed to the glDepthMask function. This value is passed by default so we do not need to call the function. If you would like to disable writing to the depth buffer but you would still like the buffer enabled, you can pass GL_FALSE onto this function.
glEnable(GL_DEPTH_TEST);
At the beginning of the tutorial, we said that the lower the depth value, the closer the coordinate is to the viewer. When a new pixel is to be rendered, it is first tested against the current value stored in the depth buffer. A simple comparison function is used to determine which of the two values should be kept. This comparison function is specified by using the glDepthFunc function. The values that can be passed onto the function are given below :
| Flag | Description |
| GL_NEVER | Never passes. |
| GL_LESS | Passes if the incoming depth value is less than the stored value. |
| GL_EQUAL | Passes if the incoming depth value is equal to the stored value. |
| GL_LEQUAL | Passes if the incoming depth value is less than or equal to the stored value. |
| GL_GREATER | Passes if the incoming depth value is greater than the stored value. |
| GL_NOTEQUAL | Passes if the incoming depth value is not equal to the stored value. |
| GL_GEQUAL | Passes if the incoming depth value is greater than or equal to the stored value. |
| GL_ALWAYS | Always passes. |
When drawing a primitive, the depth test will take place. If the test passes, the incoming color value will replace the current one.
The default value is GL_LESS. We want the test to pass if the values are equal as well. This will cause objects with the same z value. to display depending on the order that they were drawn in. We therefore pass GL_LEQUAL to the function.
glDepthFunc(GL_LEQUAL);
For depth testing to work properly, you need to initialize all values in the buffer. This can be achieved by using the glClearDepthf function. This function takes one parameter which specifies what the values in the depth buffer should be initialized with. We pass 1 to the function as this will allow any primitive to appear on the screen. If you had chosen a comparison function of GL_GREATER or GL_GEQUAL, you would have needed to pass a lower value such as 0 to this function.
	glClearDepth(1.0f);

	return true;
}
As with the color buffer, a call to glClear needs to be made to clear the depth buffer with the value passed to glClearDepth. GL_DEPTH_BUFFER_BIT must be passed onto the glClear function to achieve this. This can be done at the same time as the color buffer by separating the flags with an | (or) symbol.
void display()
{
	glClear(GL_COLOR_BUFFER_BIT | GL_DEPTH_BUFFER_BIT);
	glLoadIdentity();
To show the effect of the depth buffer, 4 triangles will be rendered to the screen. The first is rendered to the center of the screen.
drawTriangle();
The second is placed slightly to the left and behind the first triangle.
	glPushMatrix();
	{
		glTranslatef(-0.2f, 0.0f, -1.0f);

		drawTriangle();
The third is placed with the same z value as the 2nd except that it is rotated 45 degrees.
		glRotatef(45.0f, 0.0f, 0.0f, 1.0f);

		drawTriangle();
	}
	glPopMatrix();
The final triangle is placed to the right of the other triangles and is placed at the same z coordinate as the first.
	glPushMatrix();
	{
		glTranslatef(0.5f, 0.0f, 0.0f);
		glScalef(0.5f, 0.5f, 0.5f);

		drawTriangle();
	}
	glPopMatrix();

	glFlush();
}
The idle function is modified to allow the depth buffer to be toggled on and off by pressing the D key. Any flag that can be passed onto the glEnable and glDisable functions can be checked by passing the same flag to the glIsEnabled function. This function is used to test if the depth buffer is currently enabled and uses this information to determine whether to enable or disable it.
Note that with this framework, it would have been better to have a separate boolean value and to use it in the init function. The reason for this is that OpenGL's states are reset when switching between windowed and fullscreen mode.
void idle()
{
	if (opengl->isKeyDown('D'))
	{
		opengl->keyUp('D');

		if (glIsEnabled(GL_DEPTH_TEST))
			glDisable(GL_DEPTH_TEST);
		else
			glEnable(GL_DEPTH_TEST);
	}
}
Well done. You should now have a good idea on how the depth buffer works and should be able to use it in your OpenGL applications.
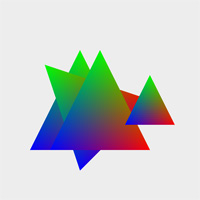
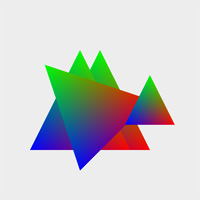
Try running the program and pressing D to toggle the depth buffer on and off. The result can be seen below.
 |
 |
| Depth Buffer Enabled | Depth Buffer Disabled |
With the depth buffer enabled, you will notice that the second and third triangles both appear behind the first triangle. This is because they are at a more negative z axis position. The fourth triangle is in front of the first triangle as it was drawn afterwards. The third triangle appears in front of the second triangle for the same reason.
Disabling depth testing by pressing D will result in the triangles overlapping depending on the order that they were drawn in. The first triangle is at the back and the last triangle is shown in the front.
Please let me know of any comments you may have : Contact Me
| Win32 Source Files : |  |
 |
||
| GLUT Source Files : |  |
 |
 |
Last Updated : 5 December 2005
| < Tutorial 10 - Transformations | Tutorial 12 - Perspective > |
All Rights Reserved, © Zeus Communication, Multimedia & Development 2004-2005
Read the Disclaimer
 |
|
|
|
What tutorial would you like to see next? |
|
Useful Books : 
|
Link to ZeusCMD

|