
 |

|
Texture Mapping |
Tutorials > OpenGL ES > Texture Mapping
| View Full Source |
Introduction
 After adding lighting, you may still not be happy with the realism of your objects.
This tutorial will show you how to add textures to your polygons. This is known as texture mapping.
The first step in texture mapping is to actually load the texture from an external file. This file can be of any type eg. bmp, jpg, gif, png, etc. This tutorial will deal only with bmp files as it is the easiest to load and we are concentrating on OpenGL, not on file formats. Tutorials may be created in the future to show how to load different file formats. Once you have loaded texture data, no matter what type it is, you will end up with the same data. Also note that OpenGL can only work with images with sizes of a power of 2 eg. 64x64, 128x128, 256x128, etc.
This tutorial is built upon tutorial 15.
Contents of main.cpp :
All textures have a specific identifier. This is represented as an unsigned integer. We create an array with enough space for 1 texture.
GLuint texture[1];
Once we have loaded our texture, we need to specify how the texture will appear on the object. This is achieved by using what is called texture coordinates.
Texture coordinates can range from 0 to 1 where (0,0) is the bottom-left of the texture and (1,1) is the top-right.
The code below creates an array used to store our texture coordinates. Looking at the front side of the box, the first vertex is the bottom-left of the side and we therefore store (0,0) for the first vertex. This technique is continued for the rest of the object.
GLfloat texCoords[] = {
	// FRONT
	 0.0f, 0.0f,
	 1.0f, 0.0f,
	 0.0f, 1.0f,
	 1.0f, 1.0f,
	// BACK
	 1.0f, 0.0f,
	 1.0f, 1.0f,
	 0.0f, 0.0f,
	 0.0f, 1.0f,
	// LEFT
	 1.0f, 0.0f,
	 1.0f, 1.0f,
	 0.0f, 0.0f,
	 0.0f, 1.0f,
	// RIGHT
	 1.0f, 0.0f,
	 1.0f, 1.0f,
	 0.0f, 0.0f,
	 0.0f, 1.0f,
	// TOP
	 0.0f, 0.0f,
	 1.0f, 0.0f,
	 0.0f, 1.0f,
	 1.0f, 1.0f,
	// BOTTOM
	 1.0f, 0.0f,
	 1.0f, 1.0f,
	 0.0f, 0.0f,
	 0.0f, 1.0f
};
The function below will load a bitmap file. This may get slightly confusing as there is a large amount of windows and file input code. Those that are used to loading a bitmap for normal desktop version of windows will notice a difference in this function. For more information on file loading, visit my C++ tutorials.
If you are in a particular directory, you cannot simply load the file by specifying the filename as Pocket PC does not keep track of the notion of a current directory. We will explain how to overcome this further below.
Before we can load a bitmap, you need to understand the structure of one. There is first a bitmap header. This contains properties such as the file type and where the bitmap data is located. This information can be loaded into a BITMAPFILEHEADER structure.
After the header, you will find an information header. This contains information such as the width, height and bits per pixel of the image. This information can be loaded into a BITMAPINFOHEADER structure.
Lastly, the actual image data follows the two headers.
The function below takes 2 parameters. The first parameter is used to specify the bitmap file that you want to load. This file is searched for in the current directory. The second parameter is a pointer to a BITMAPINFOHEADER structure. We make this a pointer as we need certain pieces of information from this structure after we have loaded the bitmap data.
unsigned char *loadBMP(char *filename, BITMAPINFOHEADER *bmpInfo)
{
We need to create a number of variables. The first is a pointer to a FILE structure so that we can open the file.
FILE *file;
As mentioned above, we need to load the file header. A BITMAPFILEHEADER structure is necessary.
BITMAPFILEHEADER bmpFile;
Image data can be represented by a number of unsigned char's. We will be creating an array to hold this data.
unsigned char *bmpImage = NULL;
A bitmap stores pixel data in a BGR(blue green red) format. We do not want this as we are dealing with RGB values. The tmpRGB variable below will be used to help us with this further down.
unsigned char tmpRGB;
An unfortunate part about determining the current working directory that we are in is that the functions you need deal with both wide characters and multibyte characters (TCHAR and char). The path variable will hold the path of our current working directory and the fullPath variable will ultimately contain the path.
	TCHAR path[256];
	char fullPath[256];
The first step in determining the current working directory is to make a call to the GetModuleFileName function. This function takes 3 parameters. The first parameter specifies the module that you are looking at. If you pass NULL, you will use the current module. The second parameter is used to specify where the path must be stored and the third parameter specifies the maximum number of characters to load.
GetModuleFileName(NULL, path, 256);
The problem with this function is that it returns the current working directory along with the exe filename that you are running. We therefore have to remove this extra piece of data.
The first step is to find the last position of the '\' character. This can be achieved by calling the wcsrchr function.
TCHAR *pos = wcsrchr(path, '\\');
Instead of actually removing the rest of the string, we can simply place a NULL character after the position found. This will cause only the data before the NULL character to be read when trying to read path.
*(pos + 1) = '\0';
We now need to convert this wide character path to a multibyte character path. This is achieved by using the wcstombs function. The first parameter specifies where the multibyte string should be stored. The second parameter specifies the wide character string that will be read from and the third parameter specifies the maximum number of characters to process.
wcstombs(fullPath, path, 256);
The last step in determining the location of the bitmap is to concatenate the path with the filename that was passed to the function.
strcat(fullPath, filename);
Now that we have the location of the bitmap file, we can open the file in binary mode.
file = fopen(fullPath,"rb");
If the file cannot be found, we display an error in a message box. If you are used to creating message boxes for desktop windows, you will be noticing the L placed before the string literals. This is because Pocket PC requires wide character strings. This L converts the string literal to a wide character string.
	if (!file)
	{
		MessageBox(NULL, L"Can't Find Bitmap", L"Error", MB_OK);
		return NULL;
	}
The BITMAPFILEHEADER is read into the structure.
fread(&bmpFile,sizeof(BITMAPFILEHEADER),1,file);
A bitmap has a file ID of 0x4D42. This value is stored in the bfType variable of the BITMAPFILEHEADER structure. If this ID is not found, we must stop loading the file.
	if (bmpFile.bfType != 0x4D42)
	{
		MessageBox(NULL, L"Incorrect texture type", L"Error", MB_OK);
		fclose(file);
		return NULL;
	}
The next step is to load the BITMAPINFOHEADER structure.
fread(bmpInfo,sizeof(BITMAPINFOHEADER),1,file);
The BITMAPFILEHEADER contains a bfOffBits property. This specifies the number of bits to the actual image data. We therefore move the file pointer from the beginning of the file (SEEK_SET) to the beginning of the image data.
fseek(file,bmpFile.bfOffBits,SEEK_SET);
Memory is allocated for the image data. The size of the image is stored in the BITMAPINFOHEADER structure.
	bmpImage = new unsigned char[bmpInfo->biSizeImage];

	if (!bmpImage)
	{
		MessageBox(NULL, L"Out of Memory", L"Error", MB_OK);
		delete[] bmpImage;
		fclose(file);
		return NULL;
	}
Once memory has been allocated, we need to load the image data from the file 1 bit at a time.
	fread(bmpImage,1,bmpInfo->biSizeImage,file);

	if (!bmpImage)
	{
		MessageBox(NULL, L"Error reading bitmap", L"Error", MB_OK);
		fclose(file);
		return NULL;
	}
Remember we said that the bitmap stores pixels in a BGR format. We therefore move through every triplet of values and swap the first and third values.
	for (unsigned int i = 0; i < bmpInfo->biSizeImage; i+=3)
	{
		tmpRGB = bmpImage[i];
		bmpImage[i] = bmpImage[i+2];
		bmpImage[i+2] = tmpRGB;
	}
The last step is to close the file and return the pointer to the image data.
	fclose(file);

	return bmpImage;
}
Now that we have a function to load bitmaps, we can start with the actual OpenGL code. Instead of placing the bitmap loading and texture generation commands in the init function, we place it in a separate loadTextures function.
bool loadTextures()
{
As was said before, we need to create a BITMAPINFOHEADER structure to hold the bitmap data. We also create a pointer to point to the image data.
	BITMAPINFOHEADER info;
	unsigned char *bitmap = NULL;
The next step is to load the bitmap using our function we created above.
	bitmap = loadBMP("zeus.bmp", &info);

	if (!bitmap)
		return false;
As was said before, every texture in OpenGL has a specific identifier called a texture name. To create these identifiers, we need to use the glGenTextures function. This function takes 2 parameters. The first parameter specifies how many texture names you want to generate. The second parameter takes a pointer to an array of unsigned integers. This will hold your generated texture names.
glGenTextures(1, texture);
Now that the texture name has been generated, you need to select what texture you want to set as the current one. This is achieved by using the glBindTexture function. This function takes 2 parameters. The first parameter must be GL_TEXTURE_2D and the second parameter accepts the texture identifier that you want to select.
glBindTexture(GL_TEXTURE_2D, texture[0]);
After selecting the texture, we need to set various properties for it. We need to specify that the texture is a 2D texture and what properties it has. This is achieved by using the glTexImage2D function. This function has a number of parameters including the following :
GLenum target - This specifies the target texture and must be specified as GL_TEXTURE_2D. OpenGL ES does not support 1D or 3D textures.
GLint level - This specifies the level of detail. 0 is the base image level. This is only used for mipmaps where there are different textures depending on the distance of the texture from the viewer.
GLint internalFormat - This specifies the color components in the texture. This can be GL_ALPHA, GL_RGB, GL_RGBA, GL_LUMINANCE or GL_LUMINANCE_ALPHA. You will generally only use the GL_RGB or GL_RGBA flags. The GL_RGBA flag is only used when you are using an image that contains alpha values such as a tga file.
GLsizei width & GLsizei height - This specifies the width and height of the image. This can be taken from our BITMAPINFOHEADER structure.
GLint border - This specifies the width of the border. This must be 0.
GLenum format - This must be given the same value as the internalFormat parameter.
GLenum type - This specifies the data type that is being used to store the image eg. GL_UNSIGNED_BYTE and GL_UNSIGNED_SHORT.
const GLvoid *pixels - This specifies where the image data is stored.
If you only want to use a part of the image, the glTexSubImage2D function can be used. This has all the same parameters except that instead of an internalFormat parameter, there are 2 other paramaters, GLint xoffset and GLint yoffset. This specifies the offset in the x and y direction for the image.
	glTexImage2D(GL_TEXTURE_2D, 0, GL_RGB, info.biWidth,
		info.biHeight, 0, GL_RGB, GL_UNSIGNED_BYTE,
		bitmap);
To set different properties of your texture, the glTexParameterf function can be used. This will be discussed further in the next tutorial. For now, all you need to know is that it takes 3 parameters. The first parameter must be GL_TEXTURE_2D. The second parameter can be either GL_TEXTURE_MIN_FILTER or GL_TEXTURE_MAG_FILTER. These specify how the texture should be shown at different magnifications. The third parameter specifies what you would like to set these properties to. We pass GL_LINEAR. This returns the weighted average of the four texture elements closest to the center of the pixel being textured. This is the best looking filter. As was said before, other properties and filters will explained in the next tutorial.
	glTexParameterf(GL_TEXTURE_2D,
		GL_TEXTURE_MIN_FILTER, GL_LINEAR);
	glTexParameterf(GL_TEXTURE_2D,
		GL_TEXTURE_MAG_FILTER, GL_LINEAR);
The texture has now been set. We can free up the memory allocated for the bitmap as now OpenGL also has the image data stored.
	delete[] bitmap;

	return true;
}
Our init function changes slightly in that it makes a call to the loadTextures function.
bool init()
{
	if (!loadTextures())
	{
		MessageBox(NULL, L"Error loading textures", L"Error", MB_OK);
		return false;
	}
To enable texture mapping, we need to pass GL_TEXTURE_2D on to the glEnable function.
	glEnable(GL_TEXTURE_2D);

	glEnable(GL_LIGHTING);
	glEnable(GL_LIGHT0);
	.
	.
Like we did for the vertices, we need to specify the location of the texture coordinates. This is done in the same way as with the vertices except that now we are using the glTexCoordPointer function. Note that a 2 is passed as the first paramater because each texture coordinate only has 2 values.
	.
	.
	glVertexPointer(3, GL_FLOAT, 0, box);
	glTexCoordPointer(2, GL_FLOAT, 0, texCoords);
The last step is to enable the texture coordinate array by passing GL_TEXTURE_COORD_ARRAY onto the glEnableClientState function.
	glEnableClientState(GL_VERTEX_ARRAY);
	glEnableClientState(GL_TEXTURE_COORD_ARRAY);
	.
	.
}
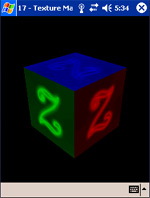
Our menu function is changed to allow lighting to be enabled or disabled. With lighting disabled, the colors that you use when creating the sides are incorporated into the texture. You can see this below. With lighting enabled, the light reflects an equal amount of light for every color and therefore the texture appears as normal.
	case 2 :
		if (glIsEnabled(GL_LIGHTING))
			glDisable(GL_LIGHTING);
		else
			glEnable(GL_LIGHTING);
		break;
Upon running the program, you are presented with a texture mapped cube. When turning off lighting, you will notice that each side of the cube remains textured but it has a different color.
| Lighting Enabled | Lighting Disabled |
|
 |
Congratulations. This was an extremely long tutorial. You should now be able to load bitmaps and deal with textures in OpenGL ES. We will discuss how you can add more properties to your textures in the next tutorial.
Please let me know of any comments you may have : Contact Me
| GLUT|ES Source Files : |  |
|
| UG Source Files : | |
Last Updated : 20 November 2005
| < Tutorial 16 - Directional Lighting | Tutorial 18 - Texture Functions > |
All Rights Reserved, © Zeus Communication, Multimedia & Development 2004-2005
Read the Disclaimer
 |
|
|
|
What tutorial would you like to see next? |
|
Useful Books : 
|
Link to ZeusCMD

|