
 |

|
Transparency |
Tutorials > OpenGL ES > Transparency
| View Full Source |
Introduction
 In the last tutorial, we spoke about how to work with color blending.
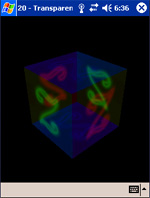
We found out that this can be extremely useful for transparency. This tutorial will show you how to create a transparent 3D object.
The tutorial is modified from tutorial 17.
Contents of main.cpp :
Our first step is to enable blending in our init function.
glEnable(GL_BLEND);
The blending function we are using is the (GL_SRC_ALPHA, GL_ONE) function.
glBlendFunc(GL_SRC_ALPHA, GL_ONE);
We want all polygons to be drawn and so we therefore disable depth testing. Having depth testing enabled will cause the polygons at the back to not display.
glDisable(GL_DEPTH_TEST);
Our menu function is modified to process a Toggle Blending menu option. Notice that we also enable and disable depth testing appropriately. This ensures that all sides are rendered.
	case 3 :
		if (glIsEnabled(GL_BLEND))
		{
			glDisable(GL_BLEND);
			glEnable(GL_DEPTH_TEST);
		}
		else
		{
			glEnable(GL_BLEND);
			glDisable(GL_DEPTH_TEST);
		}
		break;
This can create some good effects. I have left the code to enable and disable lighting as was done in tutorial 17. The difference when lighting is disabled is shown below. Here the colors are multiplied by the texture map.
| Lighting Enabled | Lighting Disabled |
|
 |
Please let me know of any comments you may have : Contact Me
| GLUT|ES Source Files : |  |
|
| UG Source Files : | |
Last Updated : 20 November 2005
| < Tutorial 19 - Blending | Tutorial 21 - Waving Flag > |
All Rights Reserved, © Zeus Communication, Multimedia & Development 2004-2005
Read the Disclaimer
 |
|
|
|
What tutorial would you like to see next? |
|
Useful Books : 
|
Link to ZeusCMD

|