
 |

|
Blending |
Tutorials > OpenGL ES > Blending
| View Full Source |
Introduction
 This tutorial will discuss color blending.
Color blending is useful for effects such as transparency eg. glass, water, windows, etc.
An essential part of blending is the alpha value that we assign to all color values. An alpha value of 0 indicates a completely transparent surface and a value of 1 indicates a completely opaque(solid) surface.
When working with blending, one must always remember 2 different colors. The one is the source color value (value being added) and the destination color value (value that exists in the buffer). The color will be worked out depending on the alpha value.
Contents of main.cpp :
This tutorial sets up an orthographic view with the following parameters.
glOrthof(0.0f, 3.0f, 0.0f, 3.0f, -1.0f, 1.0f);
We will be placing a number of overlapping rectangles on the screen. The vertex array for the rectangle is given below.
GLfloat rectangle[] = {
	-1.0f, -0.25f,
	 1.0f, -0.25f,
	-1.0f,  0.25f,
	 1.0f,  0.25f
};
We will be showing different combinations of blending. The variable below will hold what type of blending is being done.
int currBlend = 4;
Our init function starts by simply selecting a clear color. We will not be using any depth within this function.
void init()
{
	glClearColor(0.25f, 0.25f, 0.25f, 1.0f);
To enable blending, we need to pass the GL_BLEND flag onto the glEnable function.
glEnable(GL_BLEND);
An important function, glBlendFunc is used to specify how colors should be blended. The function takes 2. These specify how the colors can be computed. Both parameters can accept the following values.
GL_ZERO
GL_ONE
GL_SRC_COLOR
GL_ONE_MINUS_SRC_COLOR
GL_DST_COLOR
GL_ONE_MINUS_DST_COLOR
GL_SRC_ALPHA
GL_ONE_MINUS_SRC_ALPHA
GL_DST_ALPHA
GL_ONE_MINUS_DST_ALPHA
The first parameter can also accept a value of GL_SRC_ALPHA_SATURATE.
	glBlendFunc(GL_SRC_ALPHA, GL_ONE_MINUS_SRC_ALPHA);
}
The arrays below are used to easily switch between different examples of blending.
GLenum blendSrc[] = {
	GL_ONE,
	GL_ONE,
	GL_ONE,
	GL_SRC_ALPHA,
	GL_SRC_ALPHA
};

GLenum blendDst[] = {
	GL_ZERO,
	GL_ONE,
	GL_ONE_MINUS_DST_ALPHA,
	GL_ONE,
	GL_ONE_MINUS_SRC_ALPHA
};
Our display function places 4 rectangles on the screen forming a square.
void display()
{
	glClear(GL_COLOR_BUFFER_BIT);
	glLoadIdentity();

	glVertexPointer(2, GL_FLOAT, 0, rectangle);

	glEnableClientState(GL_VERTEX_ARRAY);

	glPushMatrix();
		glTranslatef(1.5f, 2.0f, 0.0f);
		glColor4f(1.0f, 0.0f, 0.0f, 0.5f);
		glDrawArrays(GL_TRIANGLE_STRIP, 0, 4);
	glPopMatrix();

	glPushMatrix();
		glTranslatef(0.7f, 1.5f, 0.0f);
		glRotatef(90.0f, 0.0f ,0.0f, 1.0f);
		glColor4f(0.0f, 1.0f, 0.0f, 0.5f);
		glDrawArrays(GL_TRIANGLE_STRIP, 0, 4);
	glPopMatrix();

	glPushMatrix();
		glTranslatef(1.7f, 1.5f, 0.0f);
		glRotatef(90.0f, 0.0f ,0.0f, 1.0f);
		glColor4f(0.0f, 0.0f, 1.0f, 0.25f);
		glDrawArrays(GL_TRIANGLE_STRIP, 0, 4);
	glPopMatrix();

	glPushMatrix();
		glTranslatef(1.5f, 1.0f, 0.0f);
		glColor4f(1.0f, 1.0f, 0.0f, 0.75f);
		glDrawArrays(GL_TRIANGLE_STRIP, 0, 4);
	glPopMatrix();

	glFlush();
	glutSwapBuffers();
}
Our menu function processes a Blending Function selection which simply changes the blending function.
	case 2 :
		++currBlend %= 5;
		glBlendFunc(blendSrc[currBlend], blendDst[currBlend]);
		glutPostRedisplay();
		break;
Upon running the program, you can change the blending function being used by pressing the 'b' key.
The default blending function is (GL_ONE, GL_ZERO). This causes the destination color to not be used. The new color is simply used as can be seen below :
(GL_ONE, GL_ZERO)

Our next blending function is (GL_ONE, GL_ONE). This basically takes the source and destination colors and adds them together. Values are clamped to one. A mixture of green and red forms yellow as is shown in the top-left corner. The yellow bar already has a green value of 1. The green value mixing with the yellow therefore still produces yellow. When the yellow mixes with the blue, all color values become 1, resulting in a white color.
(GL_ONE, GL_ONE)

The next function, (GL_ONE, GL_ONE_MINUS_DST_ALPHA), incorporates the destination alpha value. As you can see, this creates a slight improvement in transparency, but the yellow mixing with the green still remains yellow. The blue mixing with the green becomes white as before.
(GL_ONE, GL_ONE_MINUS_DST_ALPHA)

Our next blending function (GL_SRC_ALPHA, GL_ONE), creates a better form of transparency. The rectangles lying on top are more prominent. All rectangles now appear transparent. The yellow rectangle is more opaque sa it has an alpha value of 0.75. The blue rectangle is extremely transparent as it has an alpha value of 0.25.
(GL_SRC_ALPHA, GL_ONE)

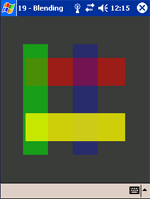
Although the above blending works very well, you may want the underlying shapes to be more prominent. This can be achieved by using the (GL_SRC_ALPHA, GL_ONE_MINUS_SRC_ALPHA) blending function.
(GL_SRC_ALPHA, GL_ONE_MINUS_SRC_ALPHA)
Well done. You should now have an idea of how to accomplish color blending. I hope you can now see how the different blending functions can be used to your advantage.
Please let me know of any comments you may have : Contact Me
| GLUT|ES Source Files : |  |
|
| UG Source Files : | |
Last Updated : 20 November 2005
| < Tutorial 18 - Texture Functions | Tutorial 20 - Transparency > |
All Rights Reserved, © Zeus Communication, Multimedia & Development 2004-2005
Read the Disclaimer
 |
|
|
|
What tutorial would you like to see next? |
|
Useful Books : 
|
Link to ZeusCMD

|