
 |

|
Color And Shading |
Tutorials > OpenGL ES > Color And Shading
| View Full Source |
Introduction
 In the previous tutorial, you learnt how to draw primitives. These primitives were a little
dull as they were all white. This tutorial will show you how to add color and shading
to your primitives.
In the previous tutorial, you learnt how to draw primitives. These primitives were a little
dull as they were all white. This tutorial will show you how to add color and shading
to your primitives.
All colors in OpenGL are represented by 4 values. The first 3 values are red, green and blue intensities. The last value is the alpha. This specifies how transparent a color is. This will be dealt with in greater detail in a future tutorial.
Recall that we said there were a number of arrays that can be used. One of these is the color array.
Contents of main.cpp :
We will be drawing one triangle in this tutorial. The 3 points of the triangle are given below.
GLfloat triangle[] = {
	0.25f, 0.25f, 0.0f,
	0.75f, 0.25f, 0.0f,
	0.25f, 0.75f, 0.0f
};
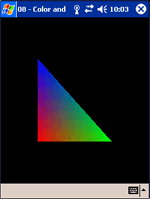
Below, we create the color array. We want to give each vertex a different color. These colors are specified in groups of 4 given below. The first color is red, the second is green and the third is blue.
GLfloat colors[] = {
	1.0f, 0.0f, 0.0f, 1.0f,
	0.0f, 1.0f, 0.0f, 1.0f,
	0.0f, 0.0f, 1.0f, 1.0f
};
A shaded boolean variable is created to keep track if the shape is shaded or not. We will be using this to switch between a shaded and a non-shaded shape.
bool shaded = false;
Once again we setup an orthographic view.
void init()
{
	glClearColor(0.0f, 0.0f, 0.0f, 0.0f);

	glMatrixMode(GL_PROJECTION);
	glLoadIdentity();
	glOrthof(0.0f, 1.0f, 0.0f, 1.0f, -1.0f, 1.0f);
The vertex array is setup in the same way as the previous tutorial.
glVertexPointer(3, GL_FLOAT, 0, triangle);
As we said above, there is also a color array at our disposal. The glColorPointer is used to setup the color array. This works in the exact same way as the glVertexPointer function. We pass a 4 as the first parameter to indicate that there are 4 floats per vertex.
glColorPointer(4, GL_FLOAT, 0, colors);
We need to enable both the vertex and color arrays.
	glEnableClientState(GL_VERTEX_ARRAY);
	glEnableClientState(GL_COLOR_ARRAY);
We are adding both color and shading to our primitives. There are two types of shading. This is specified using the glShadeModel function. This function takes one parameter specifying what type of shading will be used. The two values are GL_FLAT and GL_SMOOTH. GL_SMOOTH is set by default.
GL_FLAT causes the color of the shape to have a single color, being the last color that was specified.
GL_SMOOTH enabled smooth shading. This takes the color of every vertex and colors the primitive by interpolating the color values of all pixels in the primitive. You will see this more clearly when running the program.
We will first draw the shape using flat shading.
	glShadeModel(GL_FLAT);
}
The display method remains the same. The only difference is seen in the glDrawArrays function call. We are now drawing primitives using the GL_TRIANGLES flag and 3 vertices need to be read. This will create a single triangle.
void display()
{
   glClear(GL_COLOR_BUFFER_BIT);

   glDrawArrays(GL_TRIANGLES, 0, 3);

   glFlush();
   glutSwapBuffers();
}
Our menu function remains the same except we now allow the shading to be toggled. Also, remember to add another option to the menu in the main function i.e. (glutAddMenuEntry("Shading", 2);)
void menu(int entry)
{
	switch(entry)
	{
	case 1 : exit(0); break;
Here we change the shading mode, alternating between GL_SMOOTH and GL_FLAT.
	case 2 :
		shaded = !shaded;
		glShadeModel(shaded ? GL_SMOOTH : GL_FLAT);
	}
}
Once the change has been made, we need to redraw the screen and show a new frame to reflect the change made in the shading mode. Redrawing the window is done by calling the glutPostRedisplay function. If you are using the UG library, you will need to use the ugPostRedisplay function. The UG function takes one parameter, being the handle to the window that you want refreshed, while the GLUT|ES function does not need any parameters.
		glutPostRedisplay();
		break;
	}
}
You should now be able to make your programs more colorful by adding color and shading to your primitives. Upon executing the program, you will be presented with a blue triangle. If you select the shading menu option, you will change the shading mode.
Please let me know of any comments you may have : Contact Me
| GLUT|ES Source Files : |  |
|
| UG Source Files : | |
Last Updated : 20 November 2005
| < Tutorial 07 - Orthographic Projection | Tutorial 09 - Window Resizing > |
All Rights Reserved, © Zeus Communication, Multimedia & Development 2004-2005
Read the Disclaimer
 |
|
|
|
What tutorial would you like to see next? |
|
Useful Books : 
|
Link to ZeusCMD

|