
 |

|
Orthographic Projection |
Tutorials > OpenGL ES > Orthographic Projection
| View Full Source |
What is Orthographic Projection?
 There are 2 ways to view things. One is by viewing objects in an Orthogrpahic manner
and the other is viewing objects in a perspective view.
There are 2 ways to view things. One is by viewing objects in an Orthogrpahic manner
and the other is viewing objects in a perspective view.
Ig you have ever looked down a long road, you will notice that the road gets smaller and smaller the further down you look. This is a perspective view.
In an Orthographic view, the road would remain the same width as far as you could see.
How is Orthographic Projection Useful?
Orthographic projection runs quicker than perspective projection. This does not mean that we should always use it though. Sometimes you do not necessarily want depth eg. for 2D applications or games. Here, orthographic projection is extremely useful.
What else will be covered
In this tutorial, you will finally learn how to display a shape on the screen. Primitives are created by specifying vertices. These are points in 3D space which specify points on the shape. A list of primitives are given below along with how their vertices should be placed.
| Primitive Flag | Description |
| GL_POINTS | A point is placed at each vertex. |
| GL_LINES | A line is drawn for every pair of vertices that are given. |
| GL_LINE_STRIP | A continuous set of lines are drawn. After the first vertex, a line is drawn between every successive vertex and the vertex before it. |
| GL_LINE_LOOP | This is the same as GL_LINE_STRIP except that the start and end vertices are connected as well. |
| GL_TRIANGLES | For every triplet of vertices, a triangle is drawn with corners specified by the coordinates of the vertices. |
| GL_TRIANGLE_STRIP | After the first 2 vertices, every successive vertex uses the previous 2 vertices to draw a triangle. |
| GL_TRIANGLE_FAN | After the first 2 vertices, every successive vertex uses the previous vertex and the first vertex to draw a triangle. This is used to draw cone-like shapes. |
When drawing points, the glPointSize function is available to change the size of the points being drawn. The function takes one parameter specifying the size of the point. The default value is 1.
When drawing lines, you can use the glLineWidth function to change the width of the lines that are drawn. This function also takes one parameter which specifies what the width of the line must be. Once again, the default value is 1.
Contents of main.cpp :
The first step is to specify the coordinates for a square that we want to place on the screen. Each set of 3 floats given below specifies the x, y and z value of a vertex. The x is the horizontal position, the y is the vertical and the z is how far into or out of the screen the vertex should be. The more positive the z coordinate, the more out of the screen (towards you) it is.
The first 3 vertices are used to draw the first triangle. The last vertex is used to draw the final triangle. You can see from this that we will be using the GL_TRIANGLE_STRIP primitive.
GLfloat square[] = {
	0.25, 0.25, 0.0,
	0.75, 0.25, 0.0,
	0.25, 0.75, 0.0,
	0.75, 0.75, 0.0
    };
We start by initializing the program as we did in the last tutorial.
void init()
{
	glClearColor(0.0f, 0.0f, 0.0f, 0.0f);
When working with OpenGL, there are various matrices that are available to work with. These define your view and how primitives should be placed. When transforming primitives (discussed later), we use the GL_MODELVIEW matrix. If we want to change the projection (how objects are viewed), we use the GL_PROJECTION matrix. We can change the current matrix by using the glMatrixMode function. We pass what matrix we want to use onto the function.
glMatrixMode(GL_PROJECTION);
We want to initialize the matrix to the identity matrix. This is a matrix with 1's on the diagonals and 0's everywhere else. The identity matrix has the same properties as the value 1 in normal multiplication. Any matrix you multiply by the identity matrix will stay the same. To load the identity matrix, you use the glLoadIdentity function. This function takes no parameters.
glLoadIdentity();
At the beginning of this tutorial, we said that we would be using Orthographic projection. The glOrthof function is used to specify orthographic projection. This function takes 6 parameters, each explained below.
GLfloat left & GLfloat right - These specify the values for the left and right clipping planes.
GLfloat bottom & GLfloat top - These specify the values for the bottom and top clipping planes.
GLfloat near & GLfloat far - These specify the drawing distance. Any objects out of this range will not be displayed.
All parameters above specify an area that will be displayed in the window. Looking back at the vertices specified for the square, you can see that the square will be displayed in the center of the window.
glOrthof(0.0f, 1.0f, 0.0f, 1.0f, -1.0f, 1.0f);
We have now setup the Orthographic Projection. It is now time to render our square.
Primitives in OpenGL ES are drawn using Vertex Arrays. You need to set the current vertices to use. This is accomplished by using the glVertexPointer function. This function takes 4 parameters :
GLint size - This specifies the number of coordinates per vertex. If we had left off the 0.0f's in the square vertices above, we would have placed a 2 here. Because each vertex has been specified using 3 values, we pass a 3 for this parameter.
GLenum type - specifies what data type is being used for the values in the array eg. GL_BYTE, GL_SHORT, GL_FLOAT, etc.
GLsizei stride - specifies the offset between consecutive vertices ie. how many extra values exist between the end of the current vertex and the beginning of the next vertex. We do not have any extra data between vertices and so we therefore pass 0 for this parameter.
const GLvoid *pointer - The last parameter is used to specify the memory location of the first value in the array of values ie. the pointer to the array.
glVertexPointer(3, GL_FLOAT, 0, square);
Like the Vertex Array, there are a number of other arrays that will be covered. If not all of these arrays are being used, resources can be saved by disabling the others. All are disabled by default and so we therefore need to enable the Vertex Array. This is done by using the glEnableClientState function. This function takes one parameter, specifying the array that must be enabled. We therefore pass the GL_VERTEX_ARRAY flag to enable the Vertex Array.
	glEnableClientState(GL_VERTEX_ARRAY);
}
Now that we have setup our view and shape, we can display it. We first clear the screen as per normal. Remember that if you are using the Vincent library, the display function needs to accept a UGWindow parameter.
void display()
{
   glClear(GL_COLOR_BUFFER_BIT);
To draw the primitives using the current set of arrays, you use the glDrawArrays function. The parameters are as follows :
GLenum mode - This is used to specify what primitive to draw. Remember when we discussed the primitives above that we are going to be using the GL_TRIANGLE_STRIP primitive.
GLint first - This is used to specify the starting index in the array ie. how many vertices in the array to skip before starting to read them. We want to start from the beginning, thus requiring a value of 0 to be passed.
GLsizei count - This specifies how many vertices to process. We have 4 vertices that we want to use. This is the value that we need to pass to the function.
glDrawArrays(GL_TRIANGLE_STRIP, 0, 4);
We end off as we did in the previous tutorial.
   glFlush();
   glutSwapBuffers();
}
Before completing this tutorial, we will discuss the use of GLUT|ES context menus. If you are using GLUT|ES, you cannot open the standard keyboard. We therefore have to have another way of interacting with the program. If you are using the UG library, you can simply skip to the conclusion.
To add a context menu, you need a minimum of 3 lines of code. These are placed just before your call to glutMainLoop.
	glutCreateMenu(menu);
	glutAddMenuEntry("Quit", 1);

	glutAttachMenu(GLUT_LEFT_BUTTON);
The glutCreateMenu function simply creates a menu and accepts a parameter specifying which custom function will be used to handle a menu option being selected. Here, we pass the menu function which will be shown shortly.
The glutAddMenuEntry function accepts 2 parameters and adds a menu item to the menu. The first parameter is a character string which is used to specify the text for the menu item. The second parameter is the ID of the menu item and should be unique for each menu item. This is used to determine which menu item was selected.
The last function, glutAttachMenu, is used to attach the menu to the window. It accepts 1 parameter indicating what action must be taken to make the menu appear. Here we pass the GLUT_LEFT_BUTTON flag as we want the context menu to appear after touching the screen.
The callback function specified by glutCreateMenu is given below. It simply accepts one integer parameter which indicates the menu option that was pressed. We only have one menu item which is used to quit the application when pressed.
void menu(int entry)
{
	switch(entry)
	{
	case 1 : exit(0); break;
	}
}
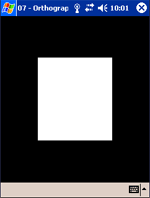
You have finally drawn something to the screen. When you run the program, you should be presented with a white box in the middle of the screen.
Please let me know of any comments you may have : Contact Me
| GLUT|ES Source Files : |  |
|
| UG Source Files : | |
Last Updated : 20 November 2005
| < Tutorial 06 - Rendering | Tutorial 08 - Color And Shading > |
All Rights Reserved, © Zeus Communication, Multimedia & Development 2004-2005
Read the Disclaimer
 |
|
|
|
What tutorial would you like to see next? |
|
Useful Books : 
|
Link to ZeusCMD

|