
 |

|
Setting Up Your Environment |
Tutorials > OpenGL > Setting Up Your Environment
| View Full Source |
Introduction
 This tutorial will show you how to setup your environment to program OpenGL in C / C++.
- If you would like to program using Windows and Microsoft Visual Studio.NET, please look at the Visual Studio.NET section.
- If you would like to program using Windows and a free compiler and development environment (Dev-C++), please look at the Dev-C++ section.
- If you would like to program using Unix / Linux, please look at the Unix / Linux section.
Microsoft Visual Studio.NET
Visual Studio.NET (VS.NET) should already be installed.
Open up VS.NET and click on File > New Project.
Select Visual C++ Projects under Project Types and select Win32 Projects under Templates
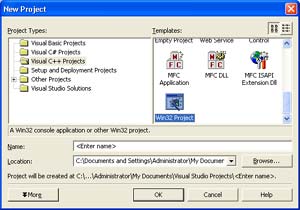
Enter a project name such as 02-SettingUpYourEnvironment and click OK
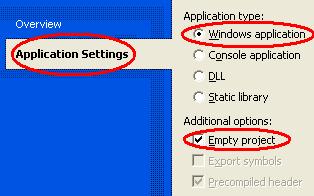
The wizard will appear. Click on Application Settings. Tick Empty Project.
If you are going to be following the tutorials using Win32, select Windows Application.
If you are going to be following the tutorials using GLUT, select Console Application.
Click Finish. If you do not see your Test project in a Solution Explorer window, click on View > Solution Explorer
Right-click on Source Files in the Solution Explorer and select Add > New Item
Highlight a C++ File(cpp) and type in main.cpp for the filename. Click OK
You will be presented with a blank page. If you press F5 now to compile your file and click Yes to build it and No to continue when build errors occur,
you will be presented with an error similar to the following "error LNK2019: unresolved external symbol _WinMain@16 referenced in function _WinMainCRTStartup".
Do not worry about this as this is because you do not have any code written. You have now learnt how to successfully set up a VS.NET project to start programming.
If you are going to be following these tutorials using Win32, please start reading the Win32 section. If you are going to be using GLUT, please start reading the GLUT section.
OpenGL using Visual Studio and Win32
The first step is to type the following into the main.cpp file :
Contents of main.cpp :
The two lines below include the two libraries needed when linking your OpenGL applications. Many other sources will show you how to configure this through the IDE but it is much simpler to place the following code in your source file. Notice that the opengl32.lib and glu32.lib files are needed. These should come standard with the latest version of Visual Studio.NET.
#pragma comment(lib, "opengl32.lib")
#pragma comment(lib, "glu32.lib")
The 3 includes below are the main header files we will be using throughout the tutorials. The GL/gl.h header file is used for the standard OpenGL functions. The GL/glu.h header file is used for those functions that are part of the OpenGL Utility functions.
#include <windows.h>
#include <GL/gl.h>
#include <GL/glu.h>

int WINAPI WinMain(HINSTANCE hInstance, HINSTANCE hPrevInstance,
				LPSTR lpCmdLine, int nShowCmd)
{
Below we place a simply OpenGL function. Do not worry about its function for now. We place it here to simply test that the correct files have been included. If you receive an error such as : error LNK2019: unresolved external symbol __imp_glEnable@4 referenced in function _WinMain@16, this means that your .lib files have not been properly located.
	glEnable(GL_LIGHTING);

	return 0;
}
You are now ready to start programming applications using OpenGL, Win32 and Visual Studio.NET.
OpenGL using Visual Studio and GLUT
Your first step is to download the GLUT package from Nate Robins' website. Download the binary package. At the time of writing this tutorial the current version was 3.7.6. The file to download was therefore glut-3.7.6-bin.zip.
Upon extracting this file, there are 3 files of use to us. These are the glut.h, glut32.lib and glut32.dll files.
You need to place the glut.h file in your Visual Studio.NET include directory and the glut32.lib file in your lib directory. These directory locations are located as follows if your Visual Studio was installed in the C:\Program Files\Microsoft Visual Studio .NET 2003\ directory.
- C:\Program Files\Microsoft Visual Studio .NET 2003\Vc7\include\gl\glut.h
- C:\Program Files\Microsoft Visual Studio .NET 2003\Vc7\lib\glut32.lib
The glut32.dll file is needed to run your compiled GLUT applications. This file needs to be in the same directory as your application to work. An easier approach is to place it in your C:\windows\system32 directory. This prevents you from having to place a glut32.dll file within the same directory as all of your created applications. The only problem with this is that you must remember to transport the glut32.dll file with any of your applications if you want them to run on another machine.
It is now time to write some code. Place the following code in your main.cpp file :
Contents of main.cpp :
Our first line simply includes the GLUT header file.
#include <GL/glut.h>

int main(int argc, char *argv[])
{
Do not worry about the 2 function calls. The first simply tests a GLUT function call while the second tests an OpenGL function call. We will discuss the working of these functions in later tutorials.
	glutInit(&argc, argv);

	glEnable(GL_LIGHTING);

	return 0;
}
If all goes well, you should now be able to create OpenGL applications using GLUT and Visual Studio.NET.
Dev-C++
Dev-C++ should already be installed. I am using the Dev-C++ Version 5 beta. This can be downloaded from www.bloodshed.net
If you are going to be following the tutorials using Win32, please continue reading the Win32 section. If you are going to be using GLUT, please read the GLUT section.
OpenGL using Dev-C++ and Win32
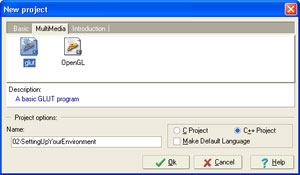
Click on File > New > Project
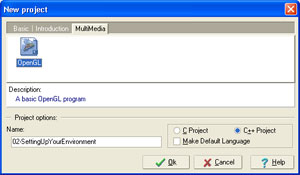
Select the Multimedia tab.
Next, Highlight OpenGL and enter 02-SettingUpYourEnvironment as a project name.
Click OK and then select where you would like your project to be stored.
You will be presented with a file containing a number of lines of code. Remove this code.
Enter the code given below.
Contents of main.cpp :
The 3 includes below are the main header files we will be using throughout the tutorials. The GL/gl.h header file is used for the standard OpenGL functions. The GL/glu.h header file is used for those functions that are part of the OpenGL Utility functions.
#include <windows.h>
#include <GL/gl.h>
#include <GL/glu.h>

int WINAPI WinMain(HINSTANCE hInstance, HINSTANCE hPrevInstance,
				LPSTR lpCmdLine, int nShowCmd)
{
Below we place a simply OpenGL function. Do not worry about its function for now. We place it here to simply test that the correct files have been included. If you receive an error such as : error LNK2019: unresolved external symbol __imp_glEnable@4 referenced in function _WinMain@16, this means that your library files have not been properly located meaning that you may not have selected an OpenGL project type.
	glEnable(GL_LIGHTING);

	return 0;
}
You have successfully set up Dev-C++ to program OpenGL using Win32.
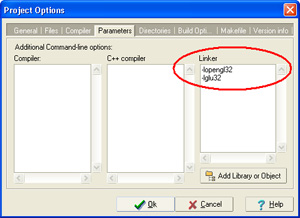
At some point, we will need the functionality of the GLU library which is not setup by default. This can be set by selecting the Project > Project Options menu. Then select the Parameters tab and add -lglu32 to the Linker box :
OpenGL using Dev-C++ and GLUT
Your first step is to download the GLUT package for Dev-C++ from Nigel Stewart's website. Download the GLUT 3.7.6+ package. After downloading the package, double click on the file and install it. This will place all necessary library and include files in your Dev-C++ installation.
Click on File > New > Project
Select the Multimedia tab. After installing the GLUT
package, you should now have a glut option.
Highlight glut and enter 02-SettingUpYourEnvironment as a project name.
Click OK and then select where you would like your project to be stored.
You will be presented with a file containing a number of lines of code. Remove this code.
Enter the code given below.
Contents of main.cpp :
Our first line simply includes the GLUT header file.
#include <GL/glut.h>

int main(int argc, char *argv[])
{
Do not worry about the 2 function calls. The first simply tests a GLUT function call while the second tests an OpenGL function call. We will discuss the working of these functions in later tutorials.
	glutInit(&argc, argv);

	glEnable(GL_LIGHTING);

	return 0;
}
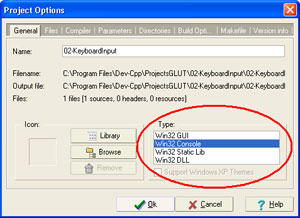
Note that no console window appears. The 2nd
and 3rd GLUT tutorials
require the console window to display output. If you would like this functionality,
simply click on Project > Project Options or
Alt + P. Then select Win32 Console
under the Type section in the General
tab as shown below :
Congratulations! You should now know how to go about compiling your GLUT source files using Dev-C++.
Unix / Linux
At present, all tutorials for Unix / Linux will be created using GLUT. Other libraries may be used at a later stage.
The first step is to make sure that GLUT is installed. This can be done by making sure that there exists a libglut file in your /usr/lib directory. If not you will need to download the GLUT rpm.
At the time of writing this tutorial, I was using Fedora Core 3. This comes standard with FreeGLUT, a library that can directly replace GLUT. If you have either, you will be able to compile the tutorials.
Type the following into a main.cpp file :
Contents of main.cpp :
Our first line simply includes the GLUT header file.
#include <GL/glut.h>

int main(int argc, char *argv[])
{
Do not worry about the 2 function calls. The first simply tests a GLUT function call while the second tests an OpenGL function call. We will discuss the working of these functions in later tutorials.
	glutInit(&argc, argv);

	glEnable(GL_LIGHTING);

	return 0;
}
Once this has been done, we need to create a Makefile :
Contents of Makefile :
The only different in the Makefile from the C++ tutorials is that 3 new libraries are included for linking. These are the OpenGL, the OpenGL Utilities and the GLUT libraries.
main : main.cpp
	g++ -lGL -lGLU -lglut main.cpp -o main

clean :
	rm -rf main
Now upon typing make, your program should successfully compile. You should be able to successfully compile your GLUT applications for Unix / Linux.
Please let me know of any comments you may have : Contact Me
| Win32 Source Files : |  |
 |
||
| GLUT Source Files : | |
|
 |
Last Updated : 4 April 2005
| < Tutorial 01 - What Is OpenGL? | Tutorial 03 - OpenGL Window > |
All Rights Reserved, © Zeus Communication, Multimedia & Development 2004-2005
Read the Disclaimer
 |
|
|
|
What tutorial would you like to see next? |
|
Useful Books : 
|
Link to ZeusCMD

|