
 |

|
Orthographic Projection |
Tutorials > OpenGL > Orthographic Projection
| View Full Source |
What is Orthographic Projection?
 There are 2 ways to view an OpenGL scene. One is by viewing objects in an
Orthographic manner and the other is viewing objects
in a perspective view.
If you have ever looked down a long road, you will notice that the road gets smaller
and smaller the further down you look. This is a perspective view. In an Orthographic view,
the road would remain the same width as far as you could see.
There are 2 ways to view an OpenGL scene. One is by viewing objects in an
Orthographic manner and the other is viewing objects
in a perspective view.
If you have ever looked down a long road, you will notice that the road gets smaller
and smaller the further down you look. This is a perspective view. In an Orthographic view,
the road would remain the same width as far as you could see.
How is Orthographic Projection Useful?
Orthographic projection runs quicker than perspective projection. This does not mean that we should always use it though. Sometimes you do not necessarily want depth eg. for 2D applications or games. Here, orthographic projection is extremely useful. One well-known example is its use in various 3D modelling packages. There is often one perspective view for viewing the model and 3 orthographic views which show the top, front and side views.
Contents of main.cpp :
For this tutorial, the orthographic projection code will be placed in the init function.
bool init()
{
	glClearColor(0.93f, 0.93f, 0.93f, 0.0f);
	glColor3f(0.0f, 0.0f, 0.0f);
When working with OpenGL, there are various matrices that are available to work with. These define your view and how primitives should be placed. When transforming primitives (discussed later), we use the GL_MODELVIEW matrix. If we want to change the projection (how objects are viewed), we use the GL_PROJECTION matrix. We can change the current matrix by using the glMatrixMode function. We pass what matrix we want to use onto the function.
glMatrixMode(GL_PROJECTION);
We want to initialize the matrix to the identity matrix. This is a matrix with 1's on the diagonals and 0's everywhere else. The identity matrix has the same properties as the value 1 in normal multiplication. Any matrix you multiply by the identity matrix will stay the same. To load the identity matrix, you use the glLoadIdentity function. This function accepts no parameters.
glLoadIdentity();
When setting up the current view (viewport), you need to specify in what section of the screen the rendering should be done. This is specified by using the glViewport function. The function accepts the following parameters :
GLint x & GLint y - These specify the top-left corner of the viewport in relation to the window's coordinates.
GLsizei width & GLsizei height - These specify the width and height of the viewport.
We want the entire window to be used for rendering, so we indicate that the top-left corner of the viewport should be (0,0) and that the width and height of the viewport is the same as the window's.
glViewport(0, 0, opengl->getWidth(), opengl->getHeight());
At the beginning of this tutorial, we said that we would be using Orthographic projection. The glOrtho function is used to specify orthographic projection. This function takes 6 parameters, each explained below.
GLfloat left & GLfloat right - These specify the values for the left and right clipping planes.
GLfloat bottom & GLfloat top - These specify the values for the bottom and top clipping planes.
GLfloat near & GLfloat far - These specify the drawing distance. Any objects out of this range will not be displayed.
All parameters above specify an area that will be displayed in the window. The GLU library has a useful function called gluOrtho2D. This is exactly the same as the glOrtho function except that you do not need to specify the near and far values. This is useful if you are creating a 2D application and do not need to deal with depth at all.
The code below simply creates an orthographic view that runs from (0,0) to (1,1), bottom-left to top-right.
gluOrtho2D(0.0, 1.0, 0.0, 1.0);
Now that the projection matrix has been setup, we need to switch back to the modelview matrix.
	glMatrixMode(GL_MODELVIEW);
	glLoadIdentity();

	return true;
}
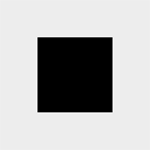
Now that the view has been set up, we render a quad to the screen. As the view has been given the area from (0,0) to (1,1), we create a square which is 0.5 x 0.5 units and is centered in the window.
void display()
{
	glClear(GL_COLOR_BUFFER_BIT);

	glBegin(GL_QUADS);
		glVertex3f(0.25f, 0.25f, 0.0f);
		glVertex3f(0.75f, 0.25f, 0.0f);
		glVertex3f(0.75f, 0.75f, 0.0f);
		glVertex3f(0.25f, 0.75f, 0.0f);
	glEnd();

	glFlush();
}
You should now be able to initialize an OpenGL window with an orthographic view. This is extremely useful for any 2D applications or if you do not want your objects to appear smaller in the background.
Please let me know of any comments you may have : Contact Me
| Win32 Source Files : |  |
 |
||
| GLUT Source Files : | |
|
 |
Last Updated : 14 October 2005
| < Tutorial 06 - Primitive Attributes | Tutorial 08 - Color And Shading > |
All Rights Reserved, © Zeus Communication, Multimedia & Development 2004-2005
Read the Disclaimer
 |
|
|
|
What tutorial would you like to see next? |
|
Useful Books : 
|
Link to ZeusCMD

|